Saturday 16 May 2015

Mid May on the allotment, enjoying the sunshine...

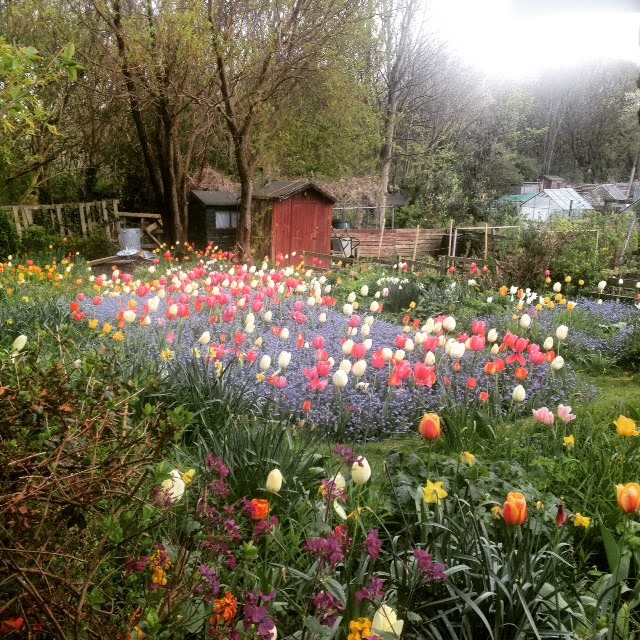
Around the corner from my house are some beautiful old allotments. They're privately owned, and I would imagine the waiting list is huge as there aren't many. But I have always loved taking a walk around the back of them. So one evening about two weeks ago I did just that. And came across the most beautiful allotment I've ever seen! Mind you, I didn't see a vegetable at all but it didn't matter. I love tulips and as you can see the plot just looked stunning. I stood looking for quite a while before my husband dragged me off, but it inspired me!
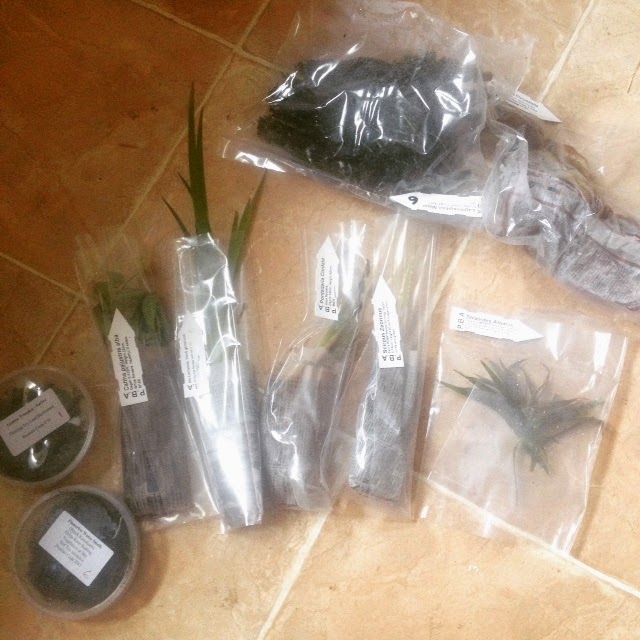
I want flowers on my allotment, granted not like this, I don't have the space for this and veg, but I have dedicated the back of my allotment for the pond and a grassy/flower area. So I started looking into various things. I think I am going to start planting flower seeds all around the outside of my vegetable beds as well, it seems like a really good way to attract pollinators, it looks amazing and they can also be cut, and taken home, which would be another wonderful bonus.


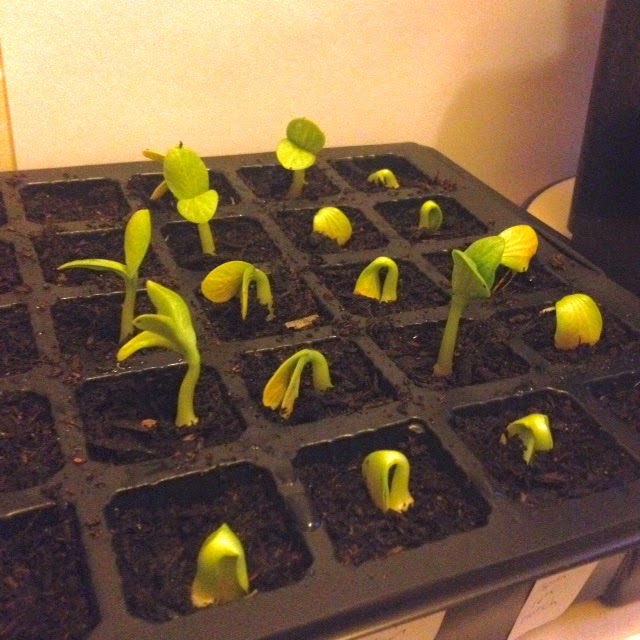
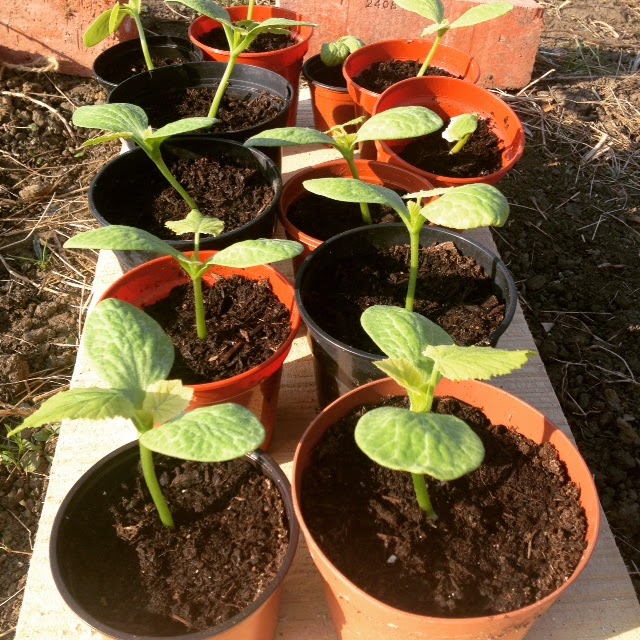
In terms of vegetables however, you read of my pumpkin disaster? Well I wasn't disheartened, instead I popped out to get more pumpkin seeds but came across butternut squash seeds instead. I use a lot more butternut squash than pumpkin so it only made sense really. So they have been sown and you can just seem them growing quite tall behind all the Brussel sprouts! They were desperate to be planted out so that was todays job, however like I said I learned from my past mistake!


I live by the sea. Our frosts stop really early in the year, but my allotment is 1 mile inland, and they have frosts a lot later into the year. I didn't think of this, which is why the pumpkins were a disaster. So, to make amends, I purchased the poly tunnel type things you can see below. I found them in Wilko's for £10 each. They're 3 metres long by about 1 metre wide when they're domed over. They are like a pop up tent. They're fab! You get tent pegs with them, but as I had turned the soil over about 3 times and mixed in compost before I put these down the pegs were a little useless. Thankfully I have a fair few spare bricks lying around so they did the job. But I put them down to warm the soil underneath. Today they have been down about two weeks, and the soil felt lovely and warm underneath when I went at 8.30am this morning. 


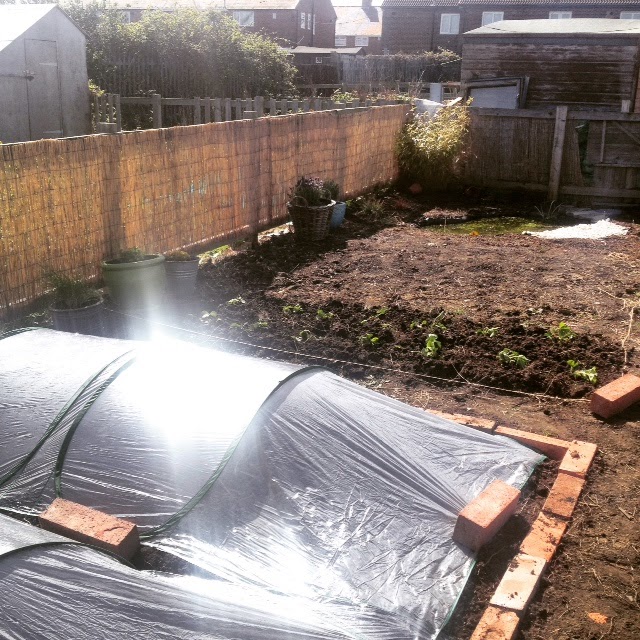
As you can see behind the poly tunnel things, I have also planted strawberries. Given to me by my allotment neighbour a week or so ago they have taken really quickly and have already started flowering, so will need to think about getting a net for them soon!
All the potted herbs are doing fantastically well too! Which is always good news.


So the photo above is when I left this morning. It's looking a lot better than it was a few months ago but still rather rough around the edges. I planted the Brussel sprouts under the poly tunnels, so will check on them frequently and I'm hoping to take the covers off in around a week or so. The strawberries behind are doing really well, and to the left off the bottom of the photo the potted potatoes are doing really well too.
 The right hand side of the allotment has sort of been left for now. That's my summer holiday project! 


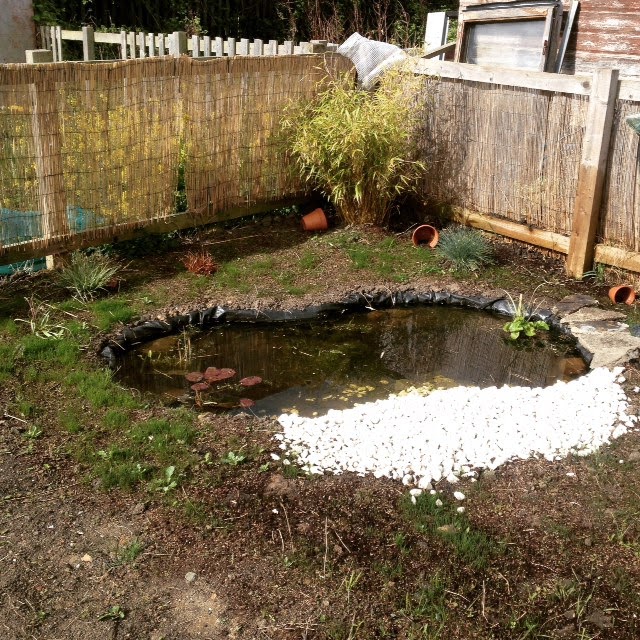
This was my pond today too. We had an explosion of algae the other day, which I read about and was told to expect it. I also read that after a few days to a week or so it would all suddenly disappear and the pond would go really clear, so when I went along this morning that had happened! No algae at all, and instead a super clear pond! I spotted a few tadpoles sitting just under the surface sunning themselves, and a few pond snails dotted around. The pond plants seem to be growing nicely now as well, with new growth on the lily and the oxygenators underneath. The grass around the outside has started to grow nicely now too, and I noticed a few of the wildflowers making an appearance which is really exciting! Can't wait to go back and see it all in bloom! Mind you, we have had a lot of rain lately and that's clearly helped the grass settle!

Building the pond! Tutorial of how I did it...

As soon as I got an allotment one of my main aims was to have a wildlife pond. I sort of see it as a little bit of my responsibility to create somewhere for British wildlife if I have the space. So as soon as I made my way to the bottom of the allotment list, pond ideas were running through my mind as well as hours worth of research.

It's now been a month since I created my pond. So I thought I would go through what I did, which didn't really cost me much at all, was pretty easy to create and has created the exact results I was after.

Step 1. Research, research, research. That's pretty much all I did for 2 months. I took notes and wrote down the things I needed to, but really, what I discovered was it was all pretty self explanatory, even though I'd never done it before.

Step 2. Plan it out on the ground. I had the perfect sunny fairly sheltered spot at the top left corner of my allotment. Research basically told me I needed to make sure I was able to get the depths I wanted for the wildlife I want.
I turned over the soil for the area where I wanted my pond, making sure to remove anything sharp and roots. I then mapped it out with bricks around the outside and checked to make sure the land was level.


Step 3. My husband helped me out a lot with this bit to be honest, but it was ultimately just a few hours of digging it out. I wanted my pond around 2 metres long and about a metre wide at it's widest. I sort of wanted it a bit of a bean shape though, just to make it a little more interested. I also wanted a slope/beach area for things to easily climb out.
Make sure you create several levels. I have gone to 60cm deep at the deepest. This is so things can hibernate at the bottom should they wish (Toads possibly) I then have a shelf at around 30cm deep for marginal plants, and then in the middle it slopes up to between 30cm deep and 15cm deep. This again was for various marginal plants. I also put the slope in at the thinnest part of the pond. What helped with ours was the soil is clay soil. So the shape stayed perfectly in place. I did see a few things that said if your soil is more fine and comes away easier, then to use a wet builders sand to help shape it. Thankfully I didn't have this issue, which did help keep costs down.


Step 4. Time to fill the pond!! I had a look in various garden centres and pond liner is expensive! So I went to my usual shop: Amazon. I found a supplier of pond liner which was ideal. It was £30 and came with a free pond protector for underneath the liner to cushion it a little more from any sharp rocks etc that may have gone unnoticed. We then literally just lay the liner over, folded it as best we could into the various crevices, then let the weight of the water do the rest. Hose went it, and about an hour later the pond was full. 


Step 5. Once the pond was full, we had to hide the liner. We trimmed it back to about a foot all around, dug a fairly shallow trench all the way around for it to dip into and then cover again with the clay soil. One issue we did come across because of the soil was it tried to retain water where it initially slopped over the sides, and became quite boggy - you can sort of see it at the bottom left of the pond. While I was ok with having a bog I didn't really want it there as it made the edges of the pond really unstable, so we stabbed through the liner a few times where it lipped over the top so the water would drain through. This fixed the problem fairly quickly. While the soil is a clay, it actually drains pretty well. 
 Once we had covered the edges in the soil we put down the pebbles on the beach area, they sort of gently slope down so things will be able to climb out.


Step 6. Time for the pond plants! I didn't have a clue what I was looking for. So I looked around at a few of our garden centres and they were useless. A very small selection and quite expensive. I then started looking online again. I found a few one website that seemed really good, but it was so expensive and delivery was £25! So  I kept looking and came across a website called Bromfield Aquatics. They were great! Huge selection, and after my research I found I really needed some oxygenators, marginals and some top cover for things to hide under. So I emailed them, and within an hour a lovely lady got back in touch telling me what selection to go for and why. She was really helpful, so a few days later I placed my order. I wanted all British natives. The only native I didn't get was the lily- but I was told the British National lilies were really big. So all the plants you can see below (and 6 pond snails) cost £35 + £8 delivery - a huge difference to the approximate £100 I was going to spend for the same things on the other website I found.


Step 7. Time to put in the plants! Mine came with the baskets as well, so all I had to buy was some aquatic compost (which I found in B&Q for £4.99) and it was as simple as that. Make sure on top of the baskets you place a few rocks/pebbles to help way the baskets and soil down. Around the outside of the pond I then planted a few different kinds of grasses, scattered some grass seeds and wildflower seeds, and haven't touched it since.


This photo is my pond today! A month after creation and it's doing really well. We had an algal bloom the other day, it lasted about 5 days but has now cleared (I read the algae fed off the nitrogen, and when it uses it all up it just dies- this is why you don't want fish in a wildlife pond as not only do they eat everything but they also create a lot of nitrogen- apparently!) So as you can see my pond plants are doing really well, the grass has taken around the outside and a few flowers are slowly starting to pop up. There are no boggy areas and despite having had a lot of rain over the last few weeks the level of the water in the pond hasn't changed. 
 We have already seen pond-skaters, a water beetle, there's some tadpoles in there and I spotted a few of the water snails this morning. A silty layer has started to build on the bottom and we placed several sized rocks in the pond to create somewhere for things to hide which always helps. I've also put some upturned terracotta pots around the outside, so once everything starts to grow and it's a warm summers day it will give the frogs somewhere to hide. 

It's safe to say I am totally in love with it! It's just so fascinating and it's different every time I go! It's amazing how they just sort of bed in and things just start to appear in it! I think the key is to just not be too protective and let nature do it's job!

Pond costs:

Liner and underlay: £30 (inc delivery)
Pond plants: £43 (inc delivery)
1 20litre bag of aquatic compost: £4.99
3 bags of white pebbles: £18
Grass and wildflower seeds: £9

So for not much over £100 I was able to create a place for me to relax next to, but most importantly to feed and attract local wildlife.

Sunday 3 May 2015

Pumpkin disaster...

So, it's been a little while but I'm afraid things got a little busy, at home, at work and of course on the allotment. So I haven't just been hiding in my house doing nothing, things on the allotment have been happening.

One of the things I learned was a vital lesson! I live in Tynemouth, right on the sea front, so we actually warm up a lot faster and have a lot less early morning frosts thanks to the salt in the air. My allotment however is about a mile and a half inland from where I live, and this actually makes a lot of difference! I'm sure you can see where I'm going with this...


These are my baby pumpkins! I got very excited about them! I used the little seed trays and kept them in the house on windowsills and things. And they were doing super!


As you can see they came up really well - nice and strong and looking really healthy! This was at the beginning of April, so as I didn't want to put them in the ground so early I moved them into larger pots...


They continued to do really well! So in the end, as it had warmed up a fair bit (In Tynemouth!) I moved them to the allotment where I finally planted them out. I was very excited! My first real vegetable in the ground!!

However, this was short lived, as I went back a few days later and discovered that they had all died! Goes to show, I really hadn't thought about the frosts, as a nice man next to my plot told me they were still suffering with early frosts. Rookie mistake that I'm not going to make again!!


On the plus side I did make a gate! There was an old bed frame in the garage of my husbands granddad's house, so I used the frame and turned it into a gate. I was pretty proud of myself, only took about an hour and was totally free! So even better! Eventually I will paint it the same colour as my future shed, but not just yet!


April proved to be super warm on the allotment during the day though! I am in a bit of a sun trap as well, so it was glorious! Especially the fortnight after the Easter holidays! So much so you can see my husband enjoying our rather lovely 'Wheelbarrow seat' Hopefully we will have a table and chairs in the future...